Showing posts with label dessert. Show all posts

Wednesday, February 26, 2014

Im back! It is Snackadium Time!! Pt 1

So, I think it is fitting to make my return to blogging about my most spectacular party spread yet.  First, why I have been gone for so long.  It was my dream to be a special education administrator so that I could help as many students with disabilities and their families as possible.  When I had started this blog I had worked 6+ years in special education and was teaching in a self contained special education high school for students with intellectual disabilities.  There I had taken many leadership positions as a teacher and helped improve the academic and transition programs at my school for 250 students and felt it was time to move to the next level.  I worked on getting my second masters in educational leadership, and that is why I stopped blogging.  There was no way I could write 10+ page papers each week and write for fun.  Then, I got my dream job.  However, district based leadership jobs are completely different than school based.  It was nothing as I imagined.  I won't get into specifics, but even though I was good at my job and made a difference, my heart is completely in the classroom with my kids.

So now I am back to blogging.  My plans have changed and for the first time in 11 years I don't have a career goal. It feels weird.  From when I graduated with my undergraduate degree until I finished my second masters degree I was continuously in school with no more than 2 semesters off.  I got my masters in special education and then was working on my doctorate in curriculum and instruction when I came down with Gastroparesis and had to scale down my dream of having a doctoral degree.  I then got my National Board Certification, and was back into school for the second masters.  I guess this is my time to breathe!

Enough about me... lets talk about the party.  For the Super Bowl our friends decided to have a party and as usual my husband and I started brainstorming what we were going to bring.  I made the mistake of mentioning a snackadium that I had seen earlier in Rachel Ray's magazine.  That small comment turned into the Snackadium madness.  My husband instantly started creating Facebook posts telling everyone about the crazy Snackadium we were going to build and bring.  Guess who was cooking it all?  Here are some of the recipe highlights.  I will share the construction, dessert dome, and final product in another post.

The first parts I created were peanut butter pretzel footballs.  I have to tell you, it took me forever to find these pretzels.  I went to 4 different stores over 2 days and nothing.  My husband finally found them at World Market.


The recipe for these pretzel footballs can be found at plainchicken.

Then I started to think about how I would create the walls of the snackadium.  I did not want to make 5 million sandwiches like other snackadiums, so instead I started to make pans upon pans of krispy treat bars.  I decided to make them using cookie pans so they would be thin enough so I could stand the bars up like walls.

The first type I made were basic krispy treats using Trix cereal.  I got the recipe from Cravingsofalunatic.  If I made them again, I would increase the amount of marshmallows.  They were a bit dry for me.


Since I wanted to do something different with my rice krispy treats, I looked for something using cake mix.  No, I can't eat them being gluten free but my cake mix chex mix went over so well I figured I would try it in another way.  I made cake batter rice crispy treats from Now you Can Pin It!  Since I didn't want to spend money on sprinkles with all of the ingredients I was buying (a small amount of $, but it was the point of it all) I used funfetti cake mix.  


Then I wanted to add some chocolate to the mix, so I chose to make these nutella rice crispy treats.


The last ones I made were my own creation.  Very easy but they were SOO good.  Glad I had some left over to snack on!

Candy Covered Rice Crispy Treats


Ingredients:  
6 cups of rice krispies 
3 Tbs of salted butter
1 10 oz bag of marshmallows 
Wilton candy melts in your favorite colors (took approximately 1.5 bags total)

In a microwave safe bowl combine the butter and marshmallows.  Heat for 1.5 minutes, stir, then go for 1.5 minutes more.  Stir until smooth then add the rice krispies.  Stir until coated.  Spray cookie sheet or pan with cooking spray and push mixture in pan.  Cool in the refrigerator.  Cut the treats into bars.  Heat the Wilton candy melts according to the directions on the bag.  Put the individual treats on parchment paper.  Take a silicone pastry brush and brush the melted candy on one side of the treat, turn, and then the other.  Let cool in fridge.  

Originally the candy was for candy coated Oreos in the Seahawks and Broncos colors, but I definitely think the krispy treats beat them out.  Did I mention how good they are?  Its the winter, I go sugar crazy. Its getting late so I will post more soon.  Glad to be back!


Wednesday, March 23, 2011

GF Dream Oatmeal Cookies

I'm back!  Well, kinda.  I'm done with my National Board portfolio which I sent in last Thursday.  I have to say the whole process was a bit unnerving.  It is not like writing essays for graduate school.  There you know the professor, how they grade, what they want, etc.  Here they gave you rubrics but I have heard that the grading process is very arbitrary and people pass or fail randomly.  Then there is the whole packing the essays process which is much more an exercise on if you can follow directions than anything else.  There is even an envelope where you put the checklist that you filled out all of the checklists.  I was literally shaking packing it up because I was so worried that I'd make a mistake and then have to pay $300 to take the essay over just because I didn't paperclip the right way.  I heard that if you take the class (apparently I am "hardcore" because I didn't) they don't let you pack it up yourself.  You have to go in and 3 supervisors have to watch and sign off that you did it correctly.

So the National Board portfolio is done but now I have the test on the 4th which I supposedly should study for... however I know special education like the back of my hand so will take a quick look at the examples and go from there.  If this whole National Board process wasn't enough I have/had three full IEPs this week and it takes me 3 - 4 hours to finish each (depending on whether or not I am sitting in front of the TV while doing it).  Plus this weekend I have to input grades for 60 report cards which I haven't done in a month and have to do IEP report cards.  I don't know why I am writing more after doing all of this but I feel like my life has to get back to normal.  I have not cooked a real dish in three weeks, have gorged myself on bottles of Mountain Dew and bags of Carmel Bugles (oh man, sooooo good!  Found at Walgreens and now can't go into Walgreens because I don't have the self control to resist), and have eaten salads, eggs, and rice in different combinations for weeks.  I just want to be back to normal but I am super, super, super stressed and burnt out.


What is the best way to deal with such stress?  Eating gluten free cookies!  These are the absolutely best oatmeal cookies ever, that is why I call them my dream oatmeal cookies.  However, they aren't mine... they are actually my mom's.  She made these cookies for me (3 doz worth) during this crazy time.  I took some to work with me and everyone raved about them (4 people at my school are gluten free).   My mom even made me an "instant mix" bag with all of the ingredients mixed together so I can add the liquids and cook and be done with it.  Since then my dad has been sending loaves of GF challah bread which is insanely good so my parents are keeping me stocked in baked goods.  THANK YOU!

GF Dream Oatmeal Cookies


Ingredients


2 cups of flour mix (2 parts brown rice flour, 2/3 part potato starch, 1/3 part tapioca flour)
2 cups GF rolled oats
1 cup dark brown sugar
1 cup sugar
2 tsp baking powder
1 tsp baking soda
3/4 xanthan gum
1/2 tsp salt
1/2 tsp cinnamon
1/2 tsp nutmeg
1/2 tsp ground ginger
2 large eggs
1 Tbs vanilla extract
1 cup unsalted butter
1 cup raisins

Preheat oven 350 degrees.  Place foil on cookie sheet and lightly grease.  Mix together butter and sugars in a large bowl until light and creamy with a electric mixer.  Then add the eggs and vanilla and mix until smooth.  Add the flour, baking powder, baking soda, xanthan gum, salt, cinnamon, nutmeg, and ginger and beat until a smooth dough forms.  Then mix in oats and raisins.

Drop in large tsp of  dough onto cookie sheet and bake for 10 minutes.   This recipe makes 60 cookies!  You can freeze unbaked dough.

Sunday, January 23, 2011

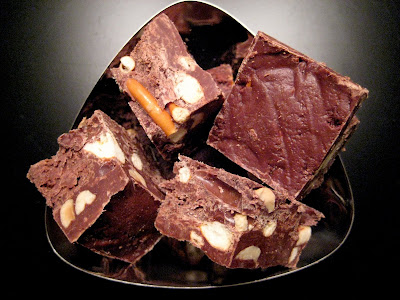
3 Types of Fudge

I had high hopes for today since my husband is out of the house and I'm by myself for the first time in a week and a half. I wanted to work on another one of my National Board essays, work out, grocery shop, and take an 1 1/2 hour yoga class. Instead I am sitting in front of our space heater jacking up our electricity bill (it is freezing outside), ordering shoes (these are awesome-and in size 11!), eating gluten free cookies (which we got at Hub51 last night, one of my favorite restaurants), and watching multiple hours of Real Housewives... Totally non productive but I miss having some time alone. I will go grocery shopping (have a crazy taste for BBQ beans and gluten free cornbread and carrot fries, although the beans wont be as good as in Kansas City which has the BEST beans) and maybe work out and write my lesson plans for this week, but that is about it.


Fudge is one of my signature desserts/sweet snacks along with pecan pie squares and chocolate bark. I have been making the cookies and cream fudge (which everyone loves) for past 4 years and am always looking for new fun flavors. It is hard to find gluten free pre-made items to put in these types of fudge, and if you can find gluten free sandwich cookies and chocolate covered pretzels buy them right away!

Cookies and Cream Fudge


Ingredients
2 12 oz bags of white chocolate
1 14 oz can of sweetened condensed milk
dash of salt
1 cup of smashed regular oreos (or gluten free sandwich cookies)
1 1/2 tsp of vanilla extract

In a saucepan mix together sweetened condensed milk, pinch of salt, and white chocolate and heat over low heat. Stir until melted. Take off of heat and mix in vanilla extract and cookies. Pour into 9 inch square pan lined with wax paper. Chill until firm. Take out of pan by flipping it over onto a cutting board and peel off wax paper. Cut into squares. Freezes very well.

Peanut Butter Surprise Fudge


Ingredients
2 12 oz bags of semi-sweet chocolate
1 14 oz can of sweetened condensed milk
dash of salt
1/2 cup of smashed of chocolate covered pretzels (can use gluten free brand like Glutino)
1/4 cup of roasted lightly salted peanuts
1/2 cup of smashed peanut butter cups
1 1/2 tsp of vanilla extract

In a saucepan mix together sweetened condensed milk, pinch of salt, and chocolate and heat over low heat. Stir until melted. Take off of heat and mix in vanilla extract, peanuts, pretzels, and peanut butter cups. Pour into 9 inch square pan lined with wax paper. Chill until firm. Take out of pan by flipping it over onto a cutting board and peel off wax paper. Cut into squares. Freezes very well.

Minty Fun Fudge


Ingredients
2 12 oz bags of dark chocolate
1 14 oz can of sweetened condensed milk
dash of salt
1/2 cup of smashed peppermint patties (you can make them homemade- check out this recipe)
1/2 cup of smashed mint oreos (I couldn't find gluten free equivalent, you could use regular sandwich cookies instead or take them out of recipe)
1/4 cup of smashed andes mints
1 1/2 tsp of vanilla extract

In a saucepan mix together sweetened condensed milk, pinch of salt, and chocolate and heat over low heat. Stir until melted. Take off of heat and mix in vanilla extract, peppermint patties, oreos and andes mints. Pour into 9 inch square pan lined with wax paper. Chill until firm. Take out of pan by flipping it over onto a cutting board and peel off wax paper. Cut into squares. Freezes very well.

Tuesday, December 28, 2010

Four Types of Chocolate Bark


This Christmas I wanted to make a treat for the four different homes that I was visiting. My husband loves my fudge but I didn't feel like making it. I had also made my famous pecan bars for a family celebration two weeks ago, so couldn't do a repeat. Then I was thinking about my candy bark. To make it you take every seasonal candy that is out there right now, mix it together, and pour white chocolate over the top. It tastes awesome and makes you feel like you are going to go into a sugar coma, but it takes some guts to try it if you are over the age of 15 and I figured people would look at it without trying. So I decided to make chocolate bark, candy bark's more sophisticated sibling.


The overall process is very similar for each recipe. Each type were scarfed down at each celebration, but my personal favorites are the Roasted Walnuts and Tart Cherries in Dark Chocolate and the Pecans in Salted Chocolate. Each recipe yields a whole cookie sheet of bark so be prepared to take it everywhere! I fed 4 different families and now still have enough to take to our friends for New Years Eve. Thank goodness because I am so tired I cant even make rice right now (recovering from the 24 hour stomach flu).

Roasted Walnuts and Tart Cherry Dark Chocolate Bark
Adapted From Food and Wine

Ingredients
2 1/2 cups of walnut halves
3 12 oz bags of bittersweet chocolate chips (I use Ghirardelli)
1 1/2 cups of dried tart cherries (coarsely chopped)
4 Tbs of crystalized ginger (finely chopped)

Preheat your oven to 350 degrees. Place the walnut halves on a cookie sheet and toast until golden and fragrant (usually around 8 minutes but keep an eye on them so they do not burn). Let cool then coarsely chop them.

When you have all your other ingredients ready, place the chocolate chips in a double boiler and stir constantly until melted. Take the double boiler off the heat and mix in the rest of your ingredients. Then pour onto a cookie sheet that has been lined with parchment paper, wax paper or foil. Using a spatula, spread out until at desired thickness or until it reaches the sides of the pan.

Let cool by putting in fridge for around an hour (should be completely hard and set before you take it out). Then either with a sharp knife or with your hands (which I usually do) break the bark into pieces.

Pistachio and Cranberry White Chocolate Bark
Adapted From Brown Eyed Baker


Ingredients
3 12oz bags of white chocolate chips* (I use Ghirardelli)
3/4 cup unsalted shelled pistachios
3/4 cup of crasins (dried cranberries)

Place the chocolate chips in a double boiler and stir constantly until melted. Take the double boiler off the heat and mix in the rest of your ingredients. Then pour onto a cookie sheet that has been lined with parchment paper, wax paper or foil. Using a spatula, spread out until at desired thickness or until it reaches the sides of the pan.

Let cool by putting in fridge for around an hour (should be completely hard and set before you take it out). Then either with a sharp knife or with your hands (which I usually do) break the bark into pieces.

*I didnt roast the pistachios but other recipes recommended it, so it is up to you whether or not you roast them

Roasted Pecans and Salted Chocolate Bark


Ingredients
2 cups of toasted pecans
2 12 oz bags of semi-sweet chocolate
2 12 oz bags of white chocolate
1 Tbs of coarse salt (I used coarse Kosher salt)

Preheat your oven to 350 degrees. Place the pecans on a cookie sheet and toast until golden and fragrant (usually around 8 minutes but keep an eye on them so they do not burn). Let cool then coarsely chop them.

When you have all your other ingredients ready, place the semi-sweet chocolate chips in a double boiler and stir constantly until melted. Then take the bowl off of the double boiler and put the white chocolate chips on the double boiler and stir constantly until melted.

Pour the white and dark chocolate in a checkerboard pattern onto a cookie sheet that has been lined with parchment paper, wax paper or foil. Then use a fork to swirl the semisweet and white chocolate together. Pour the roasted pecans on top, pushing them gently into the chocolate. Then sprinkle the salt on top of the chocolate.

Let cool by putting in fridge for around an hour (should be completely hard and set before you take it out). Then either with a sharp knife or with your hands (which I usually do) break the bark into pieces.

Candy Cane Bark


Ingredients
1 12 oz bag of semi-sweet chocolate chips
1 12 oz bag of bittersweet chocolate chips
2 12 oz bags of white chocolate chips
12 oz (2 regular packages) of candy canes, crushed

Place the semisweet and bittersweet chocolate chips in a double boiler and stir constantly until melted. Pour onto cookie sheet that has been lined with parchment paper, wax paper or foil.
Place into fridge for around 10 - 15 minutes to harden and then take out when ready for white chocolate chips.*

Place the white chocolate chips in a double boiler and stir constantly until melted. Pour onto the dark chocolate layer. Spread carefully so the brown chocolate does not show up in the white. Then pour your crushed candy canes on top and press them into the chocolate.

Let cool by putting in fridge for around an hour (should be completely hard and set before you take it out). Then either with a sharp knife or with your hands (which I usually do) break the bark into pieces.

*Many people have had the two parts of the chocolate separate when breaking the bark into pieces. I felt it was a temperature problem (as the Brown Eyed Baker has you put it in the freezer for 30 minutes) and that pouring the white chocolate on something so cold would not let the dark chocolate melt to create a bond. I still did have a little on the edges separate but not much, so it is up to you on how long you want the dark chocolate to cool

Friday, October 29, 2010

Meringues

Sugar Attack! I don't know what it is about October that makes me crave sugar. Last year I had a candy corn obsession and ate about a bag every 3 days... seriously, it was bad. This year I have stayed far away from the candy aisle, but other sweets have just been invading my life. How about the fresh cider doughnuts sitting at the apple orchard on my way home from Effingham or the brownies that are sitting on the counter at my school.... they make me want to eat gluten, and get sick.

So, this week I have had two things to help me through my sugar craze days. The first are Sprinkles cupcakes. I have always wanted to try these, and they finally came to Chicago. They only have one gluten free flavor, red velvet, but they were soooooo good! The cupcake part was really moist, different from many store/restaurant gluten free baked goods. The cream cheese frosting? Well, I could have eating a gallon if it on its own.


The second thing was meringues. These are so dangerous to make. I probably ate 4 or 5 when they were hot and then a bunch more when they were dry (and was up till 3 in the morning on a sugar high). My dad was feeling sick and I wanted to make something that both he and I could eat. In 1 day 30 of them were gone between the two of us!

Meringues


Ingredients

2 large egg whites
1/4 tsp cream of tartar
pinch of salt
1/2 cup plus 1 tablespoon of granulated sugar
1 tsp almond, vanilla, or lemon extract
(lemon extract makes yummy meringues but they are much less stiff during mixing and flat when you bake)

Preheat oven at 200 degrees. In a large bowl, put in the egg whites, cream of tartar and a pinch of salt. With a hand mixer, beat on medium speed for a minute or two until soft peaks form. Then gradually add the sugar, continuing to beat on high speed until the mixture is stiff and glossy.

Put parchment paper on baking sheets and drop the meringues by large teaspoonfuls onto the sheet. Depending on how large you make the cookies, you should have around 3 dozen. Bake in the oven for 1 hour. Turn off the oven and leave in the oven for another hour to dry.